Background
K3s is the open source, lightweight version of Kubernetes developed by SUSE. It can run on the edge where computing power is limited, which makes it ideal for scenarios with IoT devices.
As a Kubernetes native open-source IoT development framework, Shifu abstracts each IoT device into K8s pods, and expose their capabilities to applications as APIs.
Overall Architecture
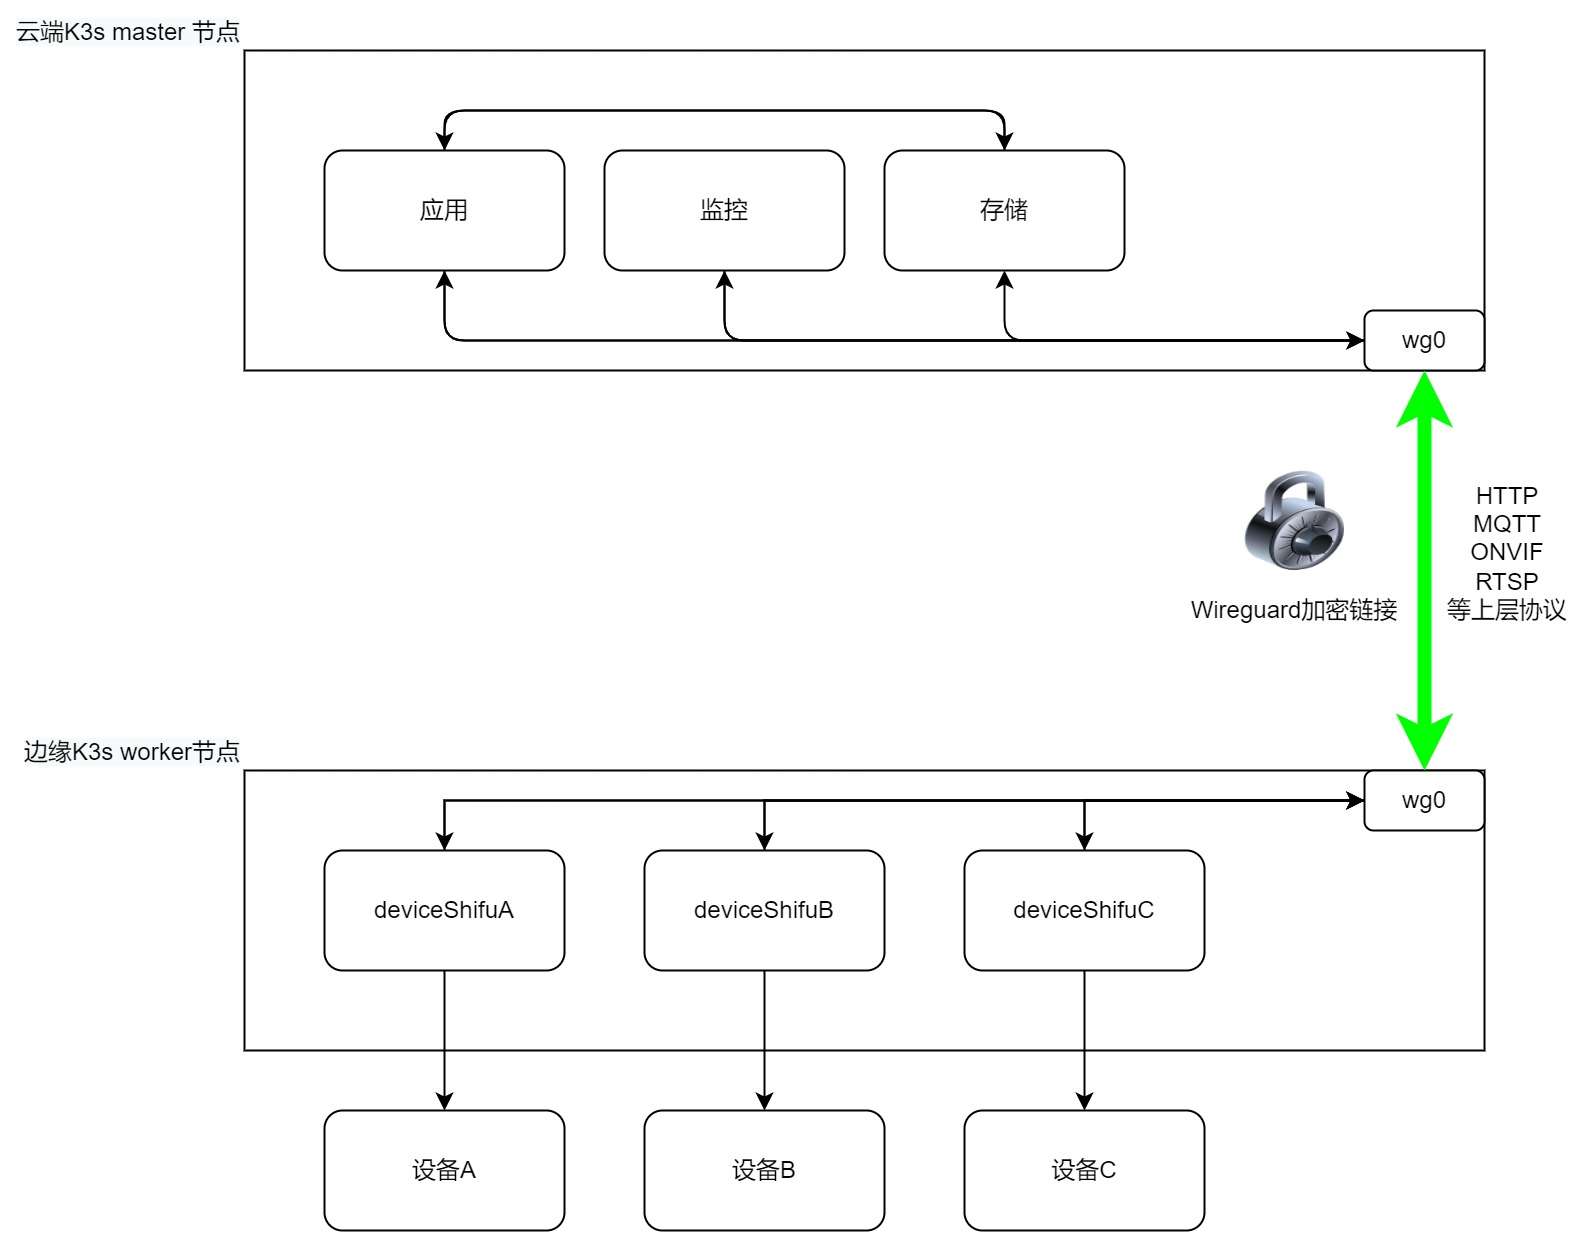
How-to Guide
Prerequisites
Software
| name | version |
|---|---|
| K3s | v1.24.4+k3s1 |
| Wireguard | v1.0.200513 |
Hardware
| name | architecture | cpu | RAM | HDD | network |
|---|---|---|---|---|---|
| master node | amd64/arm/arm64 | at least 2 | at least 2GB | 32GB | networkable, with public IP/accessible to worker nodes |
| worker node | amd64/arm/arm64 | at least 1 | at least 2GB | 16GB | networkable, with access to master node |
Steps
Deploy the wireguard server on the server side
a. Install
https://github.com/angristan/wireguard-install
b. Run the following command:
curl -O https://raw.githubusercontent.com/angristan/wireguard-install/master/wireguard-install.sh
chmod +x wireguard-install.sh
. /wireguard-install.sh
c. Enter the public IP of the server and add users on demand. The following is the actual output, please make changes accordingly.
root@localhost:~# . /wireguard-install.sh
Welcome to the WireGuard installer!
The git repository is available at: https://github.com/angristan/wireguard-install

I need to ask you a few questions before starting the setup.
You can leave the default options and just press enter if you are ok with them.

IPv4 or IPv6 public address: 192.168.0.1 # Change this to your public IP, you can get it by "curl ip.sb"
Public interface: ens5
WireGuard interface name: wg0
Server's WireGuard IPv4: 10.66.66.1 # IPv4 address of wireguard server interface, use the default value if there is no special requirement
Server's WireGuard IPv6: fd42:42:42::1 # IPv6 address of the wireguard server interface, use the default value if there is no special requirement
Server's WireGuard port [1-65535]: 64191 # Change this to your port, you need to allow UDP in the host's firewall after opening the port
First DNS resolver to use for the clients: 114.114.114.114
Second DNS resolver to use for the clients (optional): 119.29.29.29

Okay, that was all I needed. we are ready to setup your WireGuard server now.
.................................
The output here is omitted
.................................
Tell me a name for the client.
The name must consist of alphanumeric character. It may also include an underscore or a dash and can't exceed 15 chars.
Client name: client1 # After installation prompt for a username, customize it
Client's WireGuard IPv4: 10.66.66.2 # IPv4 address of the wireguard client interface, use the default value if there is no special requirement
Client's WireGuard IPv6: fd42:42:42::2 # The IPv6 address of the wireguard client interface, use the default value if there is no special requirement
.................................
The output here is omitted
.................................
It is also available in /home/ubuntu/wg0-client-client1.conf # Generate a configuration file for the worker node
d. Please save the configuration file
/home/ubuntu/wg0-client-client1.confgenerated by the script, it will be used on the worker node. e. After you run the script and has successfully added the interface, you can check the status by runningwg show all.root@localhost:~# wg show all
interface: wg0
public key: adsdadhkaskdhadkjhs12312kl3j1l2o
private key: (hidden)
listening port: 64191
peer: adsdadhkaskdhadkjhs12312kl3j1l2odsada2
preshared key: (hidden)
allowed ips: 10.66.66.2/32, fd42:42:42::2/128f. At this point, the server-side configuration is complete, if you need more clients just execute
. /wireguard-install.shDeploy K3s server on the server side
a. When you are done with step 1, you can deploy K3s on the server side through the wireguard interface, the command is as follows:
curl -sfL https://rancher-mirror.oss-cn-beijing.aliyuncs.com/k3s/k3s-install.sh | INSTALL_K3S_MIRROR=cn K3S_TOKEN=token INSTALL_K3S_EXEC = "--advertise-address=10.66.66.1 --flannel-iface=wg0" sh -b. Configuration items
K3S_TOKEN=token, wheretokencan be changed accordingly, but worker nodes should be consistent when joiningINSTALL_K3S_EXEC="--advertise-address=10.66.66.1 ---flannel-iface=wg0", here we have configured two items--advertise-address=10.66.66.1, using the wireguard interface as the IP for connection, instead of the server IP--flannel-iface=wg0, inform the flannel component of K3s to use wg0 interface
c. The output should be as follows:
[INFO] Finding release for channel stable
[INFO] Using v1.24.4+k3s1 as release
[INFO] Downloading hash rancher-mirror.oss-cn-beijing.aliyuncs.com/k3s/v1.24.4-k3s1/sha256sum-amd64.txt
[INFO] Downloading binary rancher-mirror.oss-cn-beijing.aliyuncs.com/k3s/v1.24.4-k3s1/k3s
[INFO] Verifying binary download
[INFO] Installing k3s to /usr/local/bin/k3s
[INFO] Skipping installation of SELinux RPM
[INFO] Creating /usr/local/bin/kubectl symlink to k3s
[INFO] Creating /usr/local/bin/crictl symlink to k3s
[INFO] Creating /usr/local/bin/ctr symlink to k3s
[INFO] Creating killall script /usr/local/bin/k3s-killall.sh
[INFO] Creating uninstall script /usr/local/bin/k3s-uninstall.sh
[INFO] env: Creating environment file /etc/systemd/system/k3s.service.env
[INFO] systemd: Creating service file /etc/systemd/system/k3s.service
[INFO] systemd: Enabling k3s unit
Created symlink /etc/systemd/system/multi-user.target.wants/k3s.service → /etc/systemd/system/k3s.service.
[INFO] systemd: Starting k3s
root@localhost:~#
d. Run
kubectl get pods -Ato ensure all pods are running:~# kubectl get pods -A
NAMESPACE NAME READY STATUS RESTARTS AGE
kube-system coredns-b96499967-hs6bn 1/1 Running 0 4m14s
kube-system local-path-provisioner-7b7dc8d6f5-8szzd 1/1 Running 0 4m14s
kube-system helm-install-traefik-crd-9bhdp 0/1 Completed 0 4m14s
kube-system helm-install-traefik-h5q4h 0/1 Completed 1 4m14s
kube-system metrics-server-668d979685-tlvzc 1/1 Running 0 4m14s
kube-system svclb-traefik-99c87d41-cqcnb 2/2 Running 0 3m49s
kube-system traefik-7cd4fcff68-b6cjj 1/1 Running 0 3m49se. Check master node status by running
kubectl get nodes:#kubectl get nodes
NAME STATUS ROLES AGE VERSION
ip-172-31-37-138 Ready control-plane,master 8m35s v1.24.4+k3s1f. At this point, K3s should be successfully deployed on the server-side
configure wireguard on worker node
This tutorial uses an Ubuntu 20.04.5 LTS server running on ARM64 for demonstration purposes
a. Update the software list and install resolvconf and wireguard:
apt-get update && apt-get install resolvconf wireguard -y
b. Fill the following configuration in /etc/wireguard/wg0.conf:
The last line in the configuration file AllowedIPs is 0.0.0.0/0,::/0 by default, you need to change it to the wireguard IP address 10.66.66.0/24
[Interface]
PrivateKey = casasdlaijo()(hjdsasdasdihasddad
Address = 10.66.66.2/32,fd42:42:42::2/128
DNS = 114.114.114.114,119.29.29.29

[Peer]
PublicKey = asdasd21edawd3resaedserw3rawd
PresharedKey = dasda23e134e3edwadw3reqwda
Endpoint = 192.168.0.1:64191 # This should be the public IP of the server and the open UDP port
AllowedIPs = 10.66.66.0/24 # Note that the default here is 0.0.0.0/0 and needs to be changed
c. Run the following command to bring up the wg0 interface:
wg-quick up /etc/wireguard/wg0.conf
d. Test the interface by ping 10.66.66.1, if the ping is successfull, then it is in effect.
root@k3s:~# ping 10.66.66.1
PING 10.66.66.1 (10.66.66.1) 56(84) bytes of data.
64 bytes from 10.66.66.1: icmp_seq=1 ttl=64 time=12.9 ms
64 bytes from 10.66.66.1: icmp_seq=2 ttl=64 time=13.1 ms
64 bytes from 10.66.66.1: icmp_seq=3 ttl=64 time=18.9 ms
64 bytes from 10.66.66.1: icmp_seq=4 ttl=64 time=8.21 ms
64 bytes from 10.66.66.1: icmp_seq=5 ttl=64 time=13.3 ms
64 bytes from 10.66.66.1: icmp_seq=6 ttl=64 time=7.66 ms
^C
--- 10.66.66.1 ping statistics ---
6 packets transmitted, 6 received, 0% packet loss, time 5316ms
rtt min/avg/max/mdev = 7.659/12.345/18.863/3.729 ms
Configure K3s agent on worker nodes
a. Install K3s and join the cluster:
curl -sfL https://rancher-mirror.oss-cn-beijing.aliyuncs.com/k3s/k3s-install.sh | INSTALL_K3S_MIRROR=cn K3S_TOKEN=token K3S_URL https:// 10.66.66.1:6443 INSTALL_K3S_EXEC="--node-ip=10.66.66.3 --flannel-iface=wg0" sh -b. Configuration items:
- `K3S_TOKEN=token`, where `token` needs to be the same as the server token

- `INSTALL_K3S_EXEC="--advertise-address=10.66.66.3 --flannel-iface=wg0"`, where we have configured three items.

  - `-K3S_URL=https://10.66.66.1:6443`, the IP of the master node, here it is 10.66.66.1

  - `--advertise-address=10.66.66.3`, the interface of the wireguard is used as the IP for connection, instead of the worker IP
  - `--flannel-iface=wg0`, inform the flannel component of K3s to use wg0 interface
c. The output should be as follows:
[INFO] Finding a stable channel version
[INFO] Use v1.24.4+k3s1 as release version.
[INFO] Download hash rancher-mirror.oss-cn-beijing.aliyuncs.com/k3s/v1.24.4-k3s1/sha256sum-arm64.txt
[INFO] Download the binary rancher-mirror.oss-cn-beijing.aliyuncs.com/k3s/v1.24.4-k3s1/k3s-arm64
[INFO] Verify the binary download
[INFO] Install k3s to /usr/local/bin/k3s.
[INFO] Skip the SELinux RPM installation.
[INFO] Create /usr/local/bin/kubectl symbolic link to k3s
[INFO] Create /usr/local/bin/crictl symbolic link to k3s.
[INFO] Create /usr/local/bin/ctr symbolic link to k3s
[INFO] Create killall script /usr/local/bin/k3s-killall.sh
[INFO] create uninstall script /usr/local/bin/k3s-agent-uninstall.sh
[INFO] env: Create environment file /etc/systemd/system/k3s-agent.service.env
[INFO] systemd. create service file /etc/systemd/system/k3s-agent.service
[INFO] systemd: Enabling the k3s-agent unit
Create symbolic link /etc/systemd/system/multi-user.target.wants/k3s-agent.service → /etc/systemd/system/k3s-agent.service.
[INFO] systemd. start k3s-agent
root@k3s:~#
d. On the server side, you can check whether the node has been added by
kubectl get nodes:#kubectl get nodes
Name Status Role Age Version
ip-172-31-37-138 Ready control-plane,master 24m v1.24.4+k3s1
k3s Ready <none> 2m52s v1.24.4+k3s1
Deploy Shifu by cloud-edge collaboration
a. Clone Shifu:
git clone https://github.com/Edgenesis/shifu.gitModify the image inside the controller (may not be pulled down in China):
vim shifu/pkg/k8s/crd/install/shifu_install.ymlReplace line 428 with
image: bitnami/kube-rbac-proxy:latestb. Install Shifu:
kubectl apply -f shifu/pkg/k8s/crd/install/shifu_install.ymlc. Lable the worker node of K3s:
kubectl label nodes k3s type=workerd. Try to run the Pod on the specified node, e.g. an
nginxPod:kubectl run nginx --image=nginx -n deviceshifu --overrides='{"spec": { "nodeSelector": { "type": "worker"}}}'e. Run
kubectl get pods -n deviceshifu -owide, we can see that we have successfully run the pod on the edge nodek3s#kubectl get pods -n deviceshifu -owide
NAME READY STATUS RESTARTS AGE IP NODE NOMINATED NODE
nginx 1/1 Running 0 42s 10.42.1.3 k3s
deploy a digital twin of the Hikvision camera
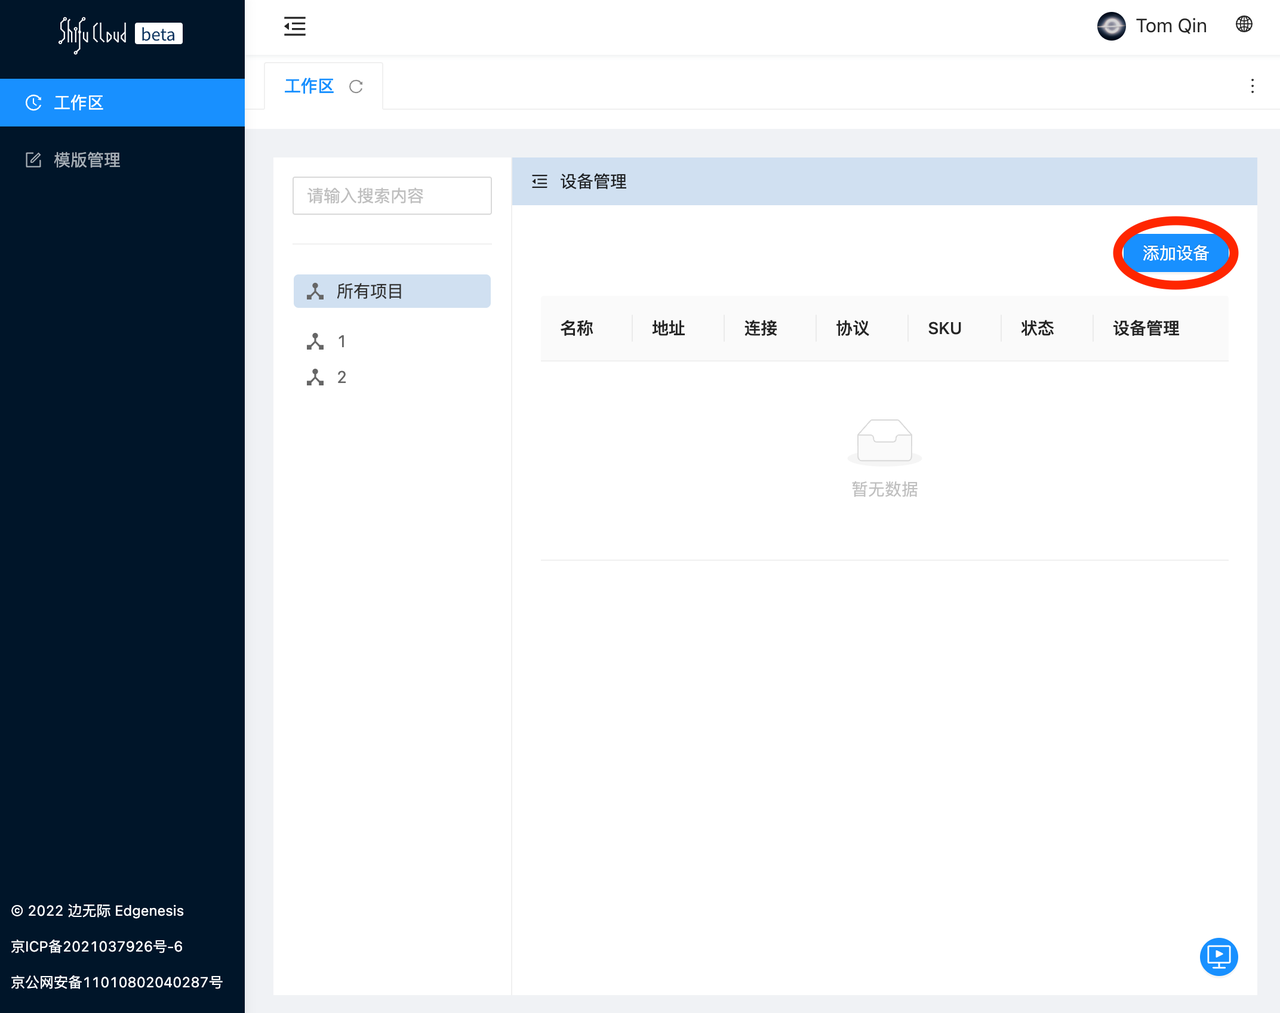
a. Login to shifu.cloud
Shifu Cloud is a PaaS based on the open source IoT development framework Shifu developed by Edgenesis, which provides convenient tools for developers to integrate IoT devices by simply filling in basic information. Without Shifu Cloud, developers need to manually fill in the YAML configuration files and then deploy the virtual devices.

b. Add device
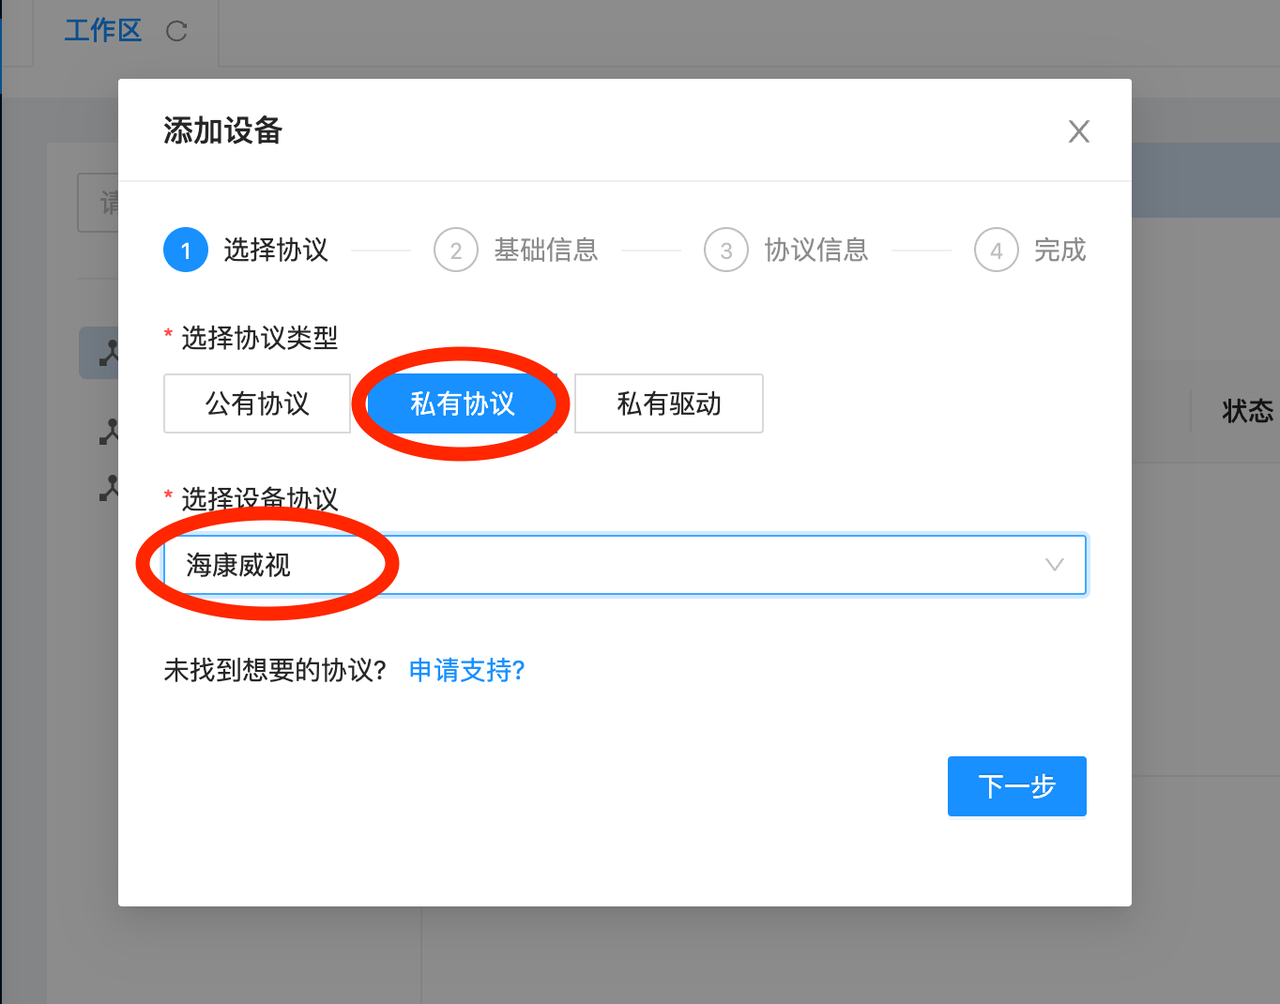
c. Select Private Protocol --> Select Hikvision in the drop-down menu, then click Next
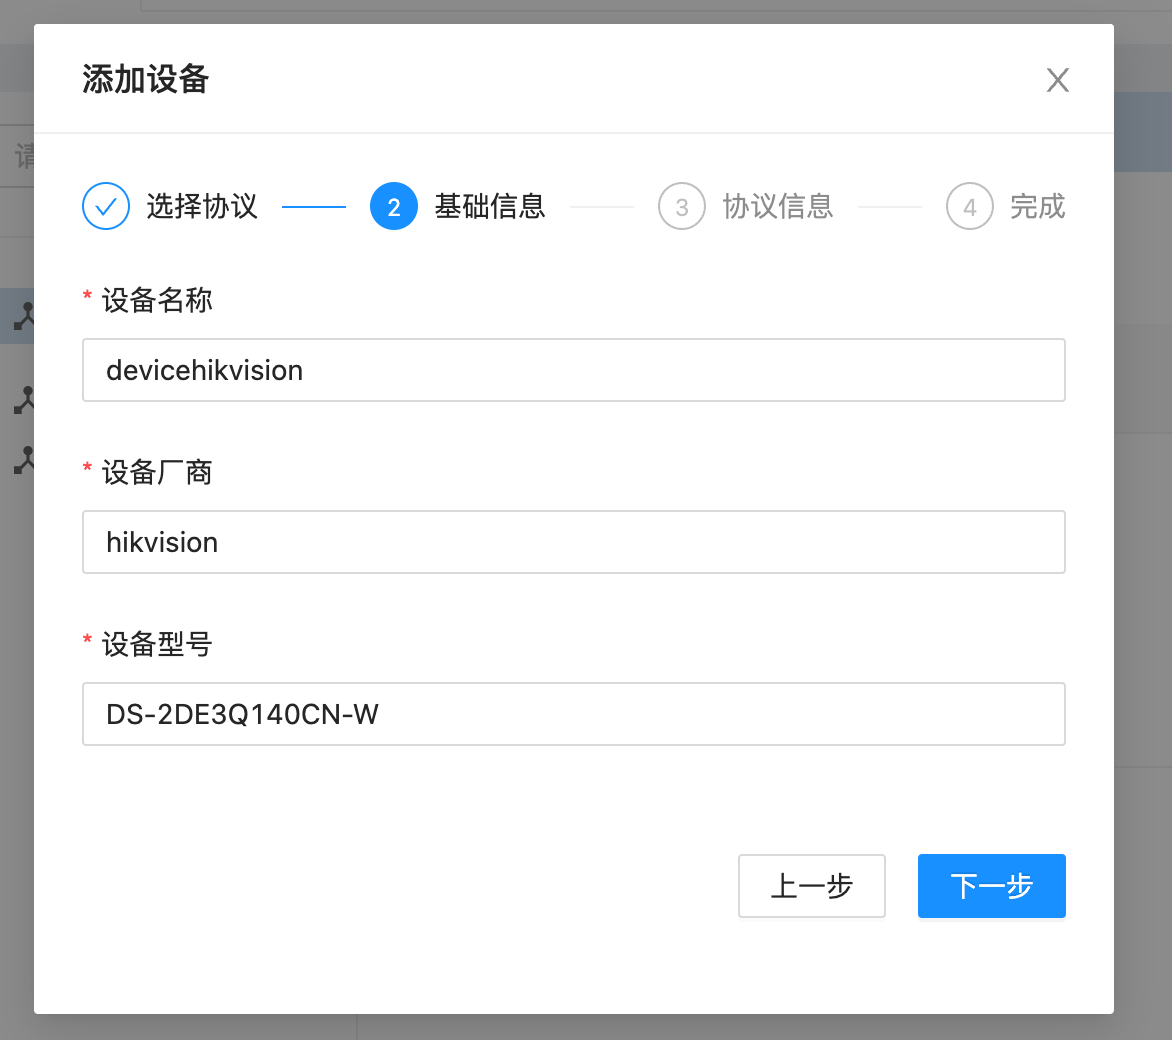
d. Add basic information about the device, such as device name, manufacturer and model:\
e. Fill in the IP address, RTSP username and password
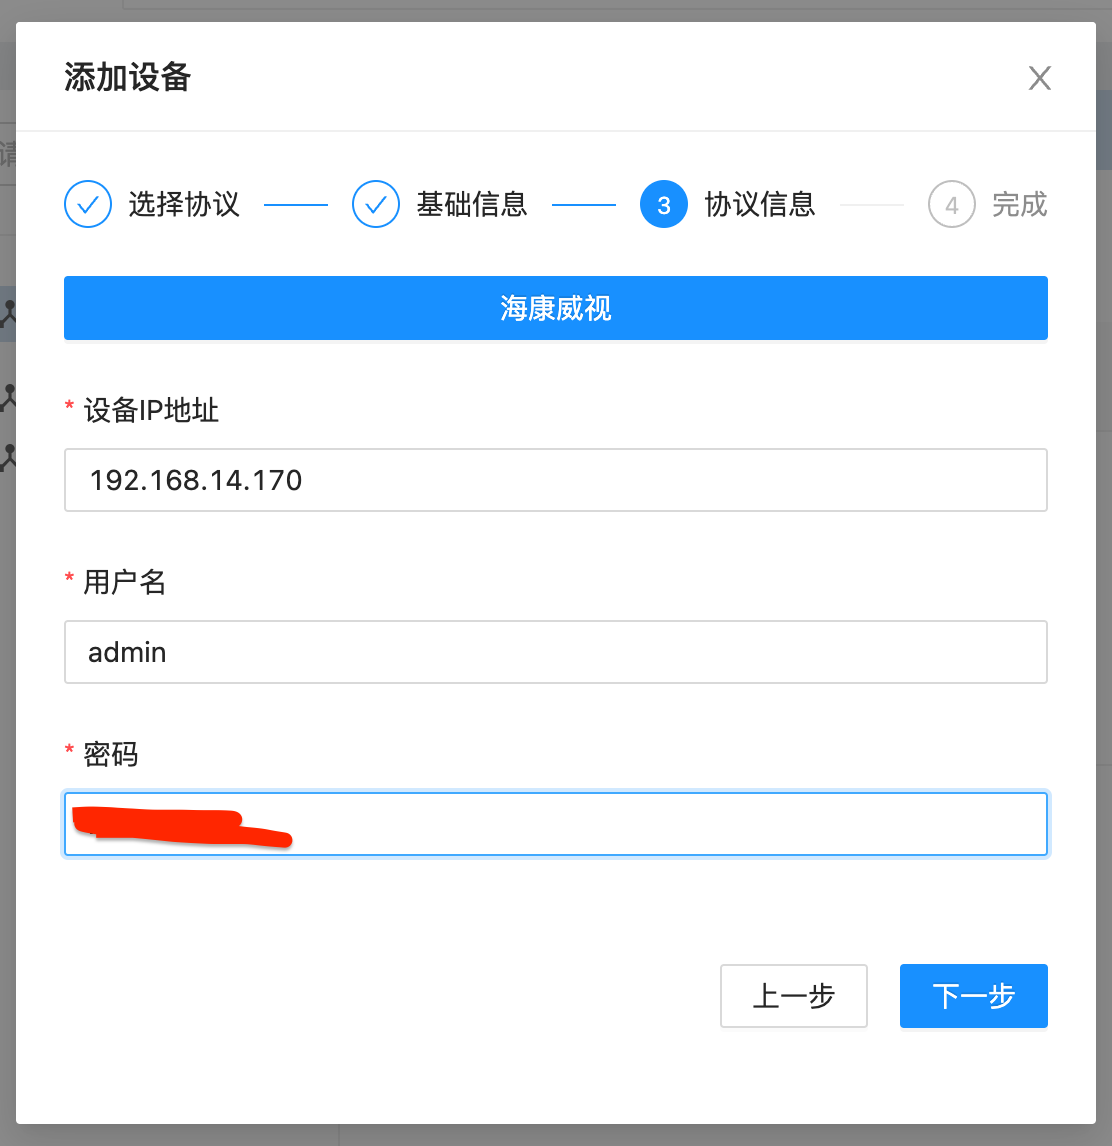
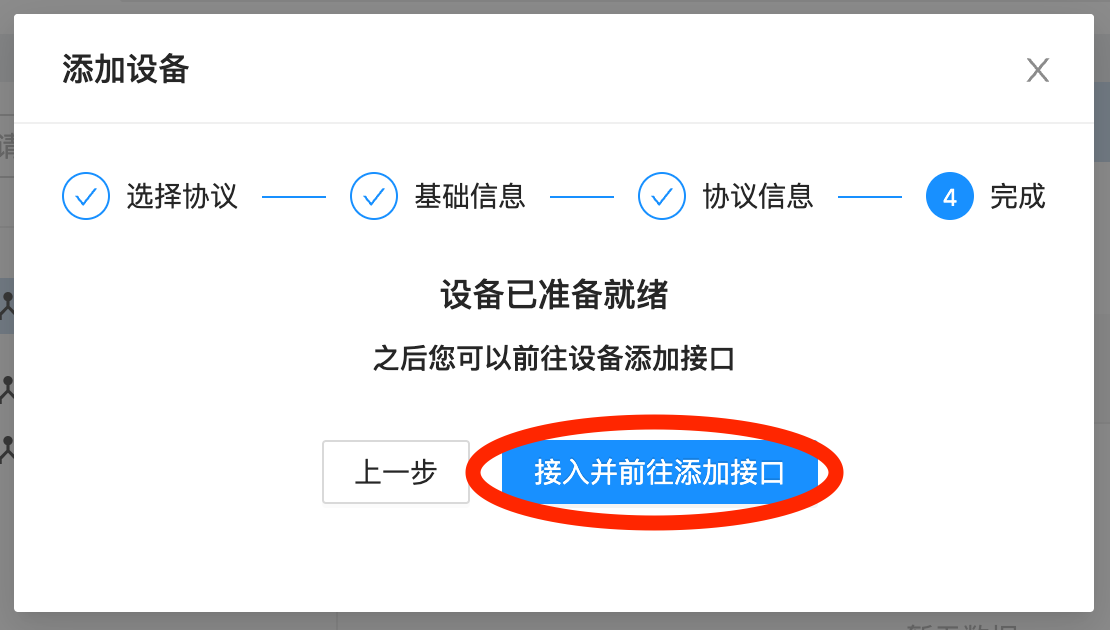
f. Click Access and go to Add Interface
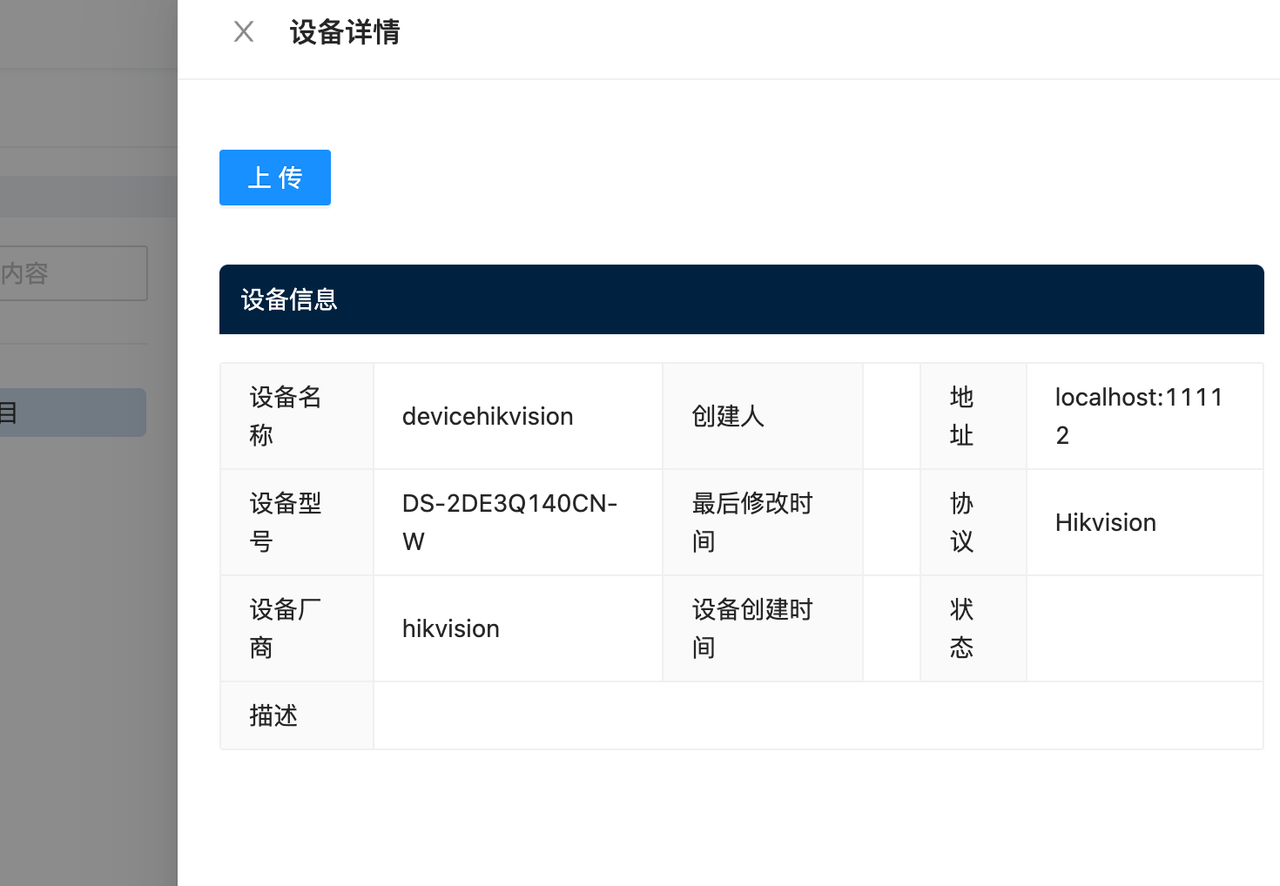
g. Finally click Upload and Shifu Cloud will automatically generate the YAML file for deviceShifu (the digital twin)
h. Copy the command and run it on the master node of K3s

i. The output should be as follows:
root@localhost:~# kubectl apply -f https://******.com/*****/******.yaml
configmap/deviceshifu-devicehikvision-configmap created
service/deviceshifu-devicehikvision-service created
deployment.apps/deviceshifu-devicehikvision-deployment created
edgedevice.shifu.edgenesis.io/edgedevice-devicehikvision created
root@localhost:~#- What happens behind the scene Shifu Cloud automatically generates the digital twin's YAML files (Edge Device, ConfigMap, Deployment and Service) with some basic information filled in by the user, if you want to go deeper, go to github to see the deployment specific files
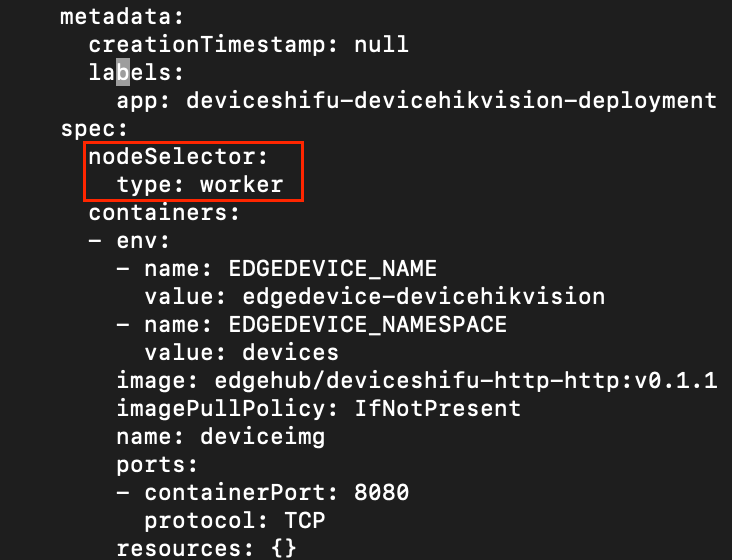
j. Shifu Cloud does not support adding nodeSelector for now (stay tuned), the device twin will be deployed on the master node by default, we need to update the
specin the deployment file to deploy the Pod in the worker node:- We get the name of the current deployment file with the command
root@localhost:~# kubectl get deployment -n deviceshifu
NAME READY UP-TO-DATE AVAILABLE AGE
deviceshifu-devicehikvision-deployment 0/1 1 0 16m - Then edit the deployment with the
kubectl edit deployment -n deviceshifu deviceshifu-devicehikvision-deploymentcommand, add the following two lines and save it:......
nodeSelector:
type: worker
......
k. At this point we look again and see that the digital twin has been deployed to the edge node
k3s:root@localhost:~# kubectl get pods -n deviceshifu -owide
NAME READY STATUS RESTARTS AGE IP NODE NOMINATED NODE READINESS GATES
nginx 1/1 Running 0 165m 10.42.1.4 k3s <none> <none>
deviceshifu-devicehikvision-deployment-5f56fb56d9-2ph5s 2/2 Running 0 21s 10.42.1.6 k3s <none> <none>
Outcome
Now we can try to interact with the camera. Let's run an nginx container on the master node to simulate the interaction between the application and devicesShifu by running
kubectl run nginx-master -n deviceshifu --image=nginxand we can see thatnginx-masteris indeed running on the master node:root@localhost:~# kubectl get po -n deviceshifu -owide
NAME READY STATUS RESTARTS AGE IP NODE NOMINATED NODE READINESS GATES
nginx 1/1 Running 0 169m 10.42.1.4 k3s <none> <none>
deviceshifu-devicehikvision-deployment-5f56fb56d9-2ph5s 2/2 Running 0 3m53s 10.42.1.6 k3s <none> <none>
nginx-master 1/1 Running 0 32s 10.42.0.11 localhost <none> <none>We can use
kubectl exec -it -n deviceshifu nginx -- bashto get tonginx-master, so that we can interact directly with the digital twin and obtain the meta information:root@localhost:~# kubectl exec -it -n deviceshifu nginx -- bash
root@nginx:/# curl deviceshifu-devicehikvision-service/info
<?xml version="1.0" encoding="UTF-8"? >
<DeviceInfo version="2.0" xmlns="http://www.hikvision.com/ver20/XMLSchema">
<deviceName>IP CAMERA</deviceName>
<deviceID>*****</deviceID>
<deviceDescription>IPCamera</deviceDescription>
<deviceLocation>hangzhou</deviceLocation>
<systemContact>Hikvision.China</systemContact>
<model>DS-2DE3Q140CN-W</model
<serialNumber>DS-*****</serialNumber>
<macAddress>c8:02:8f:c8:86:11</macAddress
<firmwareVersion>V5.5.800</firmwareVersion>
<firmwareReleasedDate>build 210816</firmwareReleasedDate>
<encoderVersion>V7.3</encoderVersion
<encoderReleasedDate>build 200601</encoderReleasedDate>
<bootVersion>V1.3.4</bootVersion
<bootReleasedDate>100316</bootReleasedDate>
<hardwareVersion>0x0</hardwareVersion
<deviceType>IPCamera</deviceType>
<telecontrolID>88</telecontrolID>
<supportBeep>true</supportBeep
<supportVideoLoss>false</supportVideoLoss
<firmwareVersionInfo>B-R-E7-0</firmwareVersionInfo>
</DeviceInfo>The camera can be controlled directly by the following command:
curl deviceshifu-devicehikvision-service/move/{up/down/left/right}If we want to see what the camera is currently shooting and the current video stream, we need forward the local port to a pod by using
kubectl port-forward -n deviceshifu service/deviceshifu-devicehikvision-service 30080:80 -- address 0.0.0.0The image/video stream can be viewed directly by entering the server's IP and port number in the browser:<SERVER_IP>:30080/capture<SERVER_IP>:30080/stream
Summary
In this article, we shared how to run Shifu in a K3s cluster, and achieve cloud-edge collaborative device control and data collection.
In the future, Shifu Cloud will continue to integrate with Kubernetes, add deployment control for edge nodes and automatically deploy device twins to the cluster without manual replication.
Thank you very much for reading, we look forward to your feedback, don't hesitate to leave comments if you like this article or have any suggestions.